
Toll House Pie is warm, gooey, and studded with chocolate chips. It’s a dessert that bridges cookie and pie in one nostalgic slice. Based on the official Nestlé Toll House recipe from the 1987 spiral-bound cookbook.
I saw this pie on social media recently and it caught my attention. It was in a reel by @innkeepercaroline, who gave a glimpse into life as a baker at an inn. Her prep includes delicious coffee cakes, dinner rolls, and drool-worthy cookie trays – as well as Toll House Pie. Apparently so highly regarded by inn guests, that it’s in regular rotation as a best seller.
I’m fascinated by these little insights. What are people most drawn to on a dessert menu? Especially while traveling or on holiday? After sampling this pie, I think the answer is clear: something rich and indulgent. Luckily, I have access to a copy of the 1987 cookbook (spiral bound) from Nestle Toll House with the original recipe inside. My husband’s Aunt Valerie gifted it to him as a kid. So I dug it out and gave the pie several test runs to see how it performed in a modern home oven.

Toll House Pie Origins
This pie originates from another inn, of course. The Toll House Inn in Whitman, Massachusetts, which was owned and operated by Ruth Graves Wakefield and her husband in the 1930’s. As the chocolate chip cookie became a national staple after it’s invention in the 1930’s, Nestlé expanded the concept into a pie version. Which is essentially a chocolate chip cookie batter baked in a pastry shell. It gained popularity in the 1970s and 1980s as an easy, crowd-pleasing dessert.

Toll House Pie is Made with Pantry Staples
The pie’s appeal lies in its simplicity: pantry staples, no complicated techniques, and a texture that lands somewhere between a gooey butter cake and a soft-set cookie. Use a refrigerated or frozen pie crust (thawed) for the easiest version of this pie.
Aside from a pie crust (store bought or homemade), you’ll need white and brown sugars, unsalted butter, large eggs, flour, walnuts and chocolate chips.

Mix the Filling
In a large mixing bowl, beat the eggs with a hand mixer for about 3 full minutes. The mixture should look visibly lighter, airy, and foamy, not just blended (see upper L.H. image). This step incorporates air, which helps create that slightly crackled top and soft interior texture.
Add the flour, granulated sugar, and brown sugar. Mix until well combined. Once incorporated, pour in the melted butter and mix until smooth.
Using a spatula, fold in the semi-sweet chocolate chips and chopped nuts (if using). Stir gently but thoroughly so they’re evenly distributed throughout the batter.

Bake the Pie at 325°F
Pour the batter into the prepared pie shell. Bake for 55–60 minutes, or until the top is golden brown and the center is set but still slightly soft. If the edges begin to brown too quickly, loosely tent with foil during the last 15 minutes.
Allow the pie to cool completely on a wire rack. If you slice into it too soon, the inside will be fluid. As it cools, the center will continue to set, creating the chewy-meets-gooey texture. The surface will be shiny and crackly – a texture akin to brownies. This pie keeps well for 4-ish days at room temperature, and even longer in the refrigerator.

Toll House Pie Testing Notes
Butter amount matters. This is where I deviate from the original 1987 recipe, but just slightly. The original Nestlé Toll House recipe calls for 1 whole cup of melted butter, which will almost certainly bubble over the crust and spill out as it bakes. (You’re welcome to ask me about my PTSD from repeatedly fanning the smoke detector.) Reducing the butter slightly allows the pie to bake neatly and set properly without sacrificing the ooey-gooey texture that defines this dessert.
Beat the eggs until truly foamy. This step takes about 3 minutes with a hand mixer and should not be rushed. The eggs should look lighter in color and visibly aerated – not just blended. Greasy or overly dense results can often be traced back to under-beaten eggs.
Bake low and slow. 325°F is the magic number here. Toll House Pie benefits from a moderate oven temperature, which helps the filling set evenly without overbrowning the crust. If your oven runs hot, the top will brown too quickly, so loosely tent the pie with foil during the final stretch.
Expect a soft center while hot. This pie continues to set as it cools. Cutting too soon can make it appear underbaked even when it’s not – a common concern echoed in feedback I researched from the Nestle website. For clean slices and the classic chewy-meets-gooey interior, let the pie cool completely before serving.

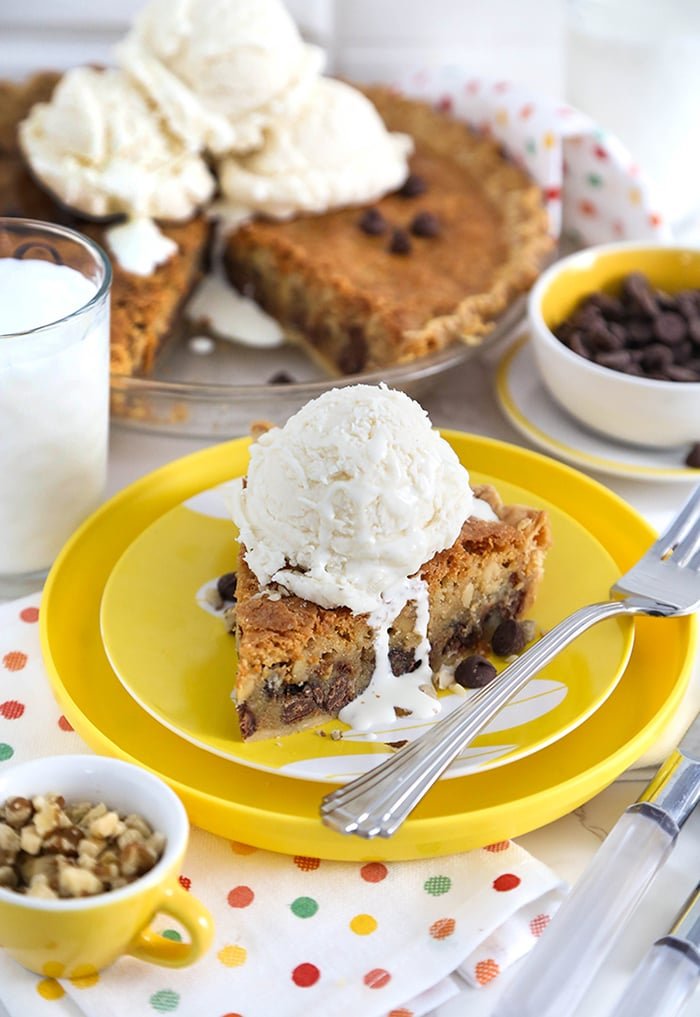
This cookie pie is the best of both worlds, with a texture somewhere between a gooey butter cake and a soft set cookie. I can see why it’s a best seller! It is truly rich and indulgent, and I find a scoop of ice cream on top of a gently warmed slice is essential to cut some of the pie’s richness.
Related Recipe: Chocolate Chip Cookie Mug Cake

Toll House Pie (1987)
Preheat oven to 325°F. Place the deep-dish pie crust on a rimmed baking sheet to catch any bubbling during baking. Set aside.
In a large mixing bowl, beat the eggs on high speed with a hand mixer for about 3 full minutes. The eggs should become lighter in color, airy, and visibly foamy. This step incorporates air and helps create the pie’s signature texture.
Reduce mixer speed to medium and add the granulated sugar and brown sugar. Beat until fully combined and smooth, scraping down the sides of the bowl as needed.
Add the flour and mix on low speed just until incorporated. Avoid overmixing at this stage to keep the texture tender.
Pour in the melted butter. Continue mixing until the batter is smooth and glossy. The mixture will be thickened, yet loose enough to pour.
Using a spatula, gently fold in the chocolate chips and toasted walnuts until evenly distributed throughout the batter. Spoon or pour the filling into the prepared pie crust, spreading it evenly to the edges.
Bake for 55 – 60 minutes, or until a knife inserted halfway between the edge and center comes out clean. The center may still appear slightly soft but will continue to set as it cools.
Transfer pie to a wire rack and cool completely before slicing for the cleanest cuts. Serve slightly warm or at room temperature with vanilla ice cream or whipped cream if desired.
Use a deep-dish crust. The filling rises as it bakes and then settles slightly as it cools. A deeper crust helps contain the batter and prevents overflow.
Beat the eggs thoroughly. Properly foamed eggs create structure and help prevent a dense or greasy texture. If the eggs are only lightly mixed, the finished pie may bake up heavy.
Toast the walnuts first. Toasting enhances flavor and ensures the nuts stay pleasantly crisp inside the soft filling.
Bake on a rimmed sheet. Even with proper proportions, this pie can bubble enthusiastically. A baking sheet prevents messes in your oven. It also provides extra support for the pie if you’re using a frozen pie crust fitted into a disposable aluminum pan.
Allow full cooling time. The pie continues to set as it cools. Cutting too early can make the center seem underbaked even when it’s properly done.
Tent if needed. If the crust edges brown too quickly, loosely cover them with foil during the last 15 minutes of baking.