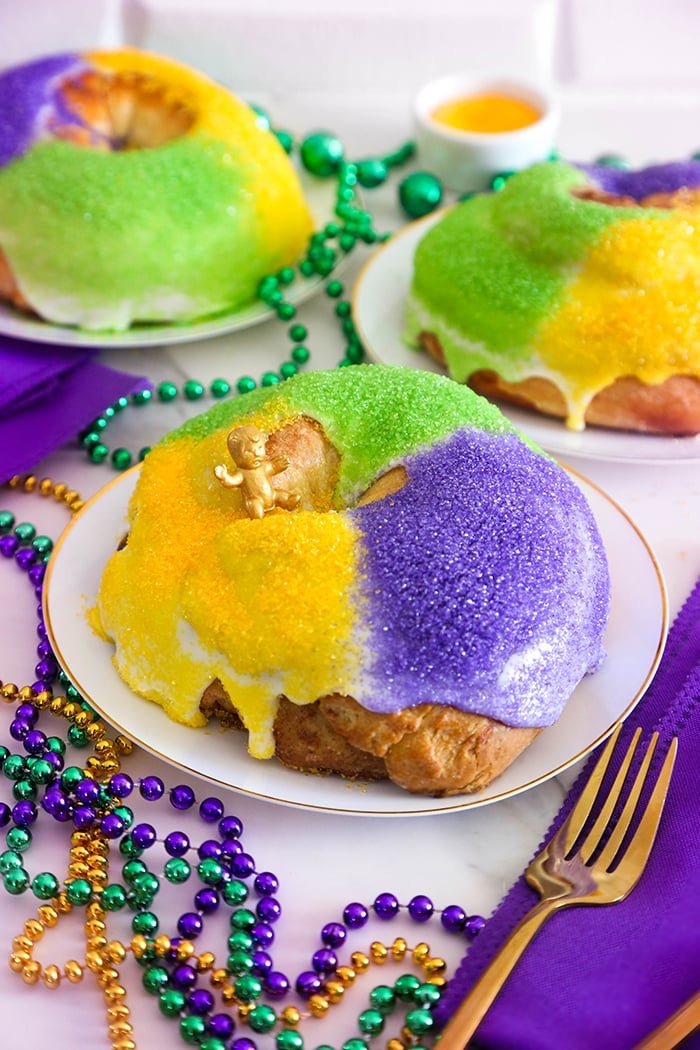
These Mini King Cakes are the perfect way to celebrate Mardi Gras, and easy to share. Instead of just one cake, this scratch-made recipe yields three soft, puffy cakes filled with cinnamon brown sugar, studded with walnuts, and finished with glaze and sparkling sanding sugar.
King cake has always been my favorite Mardi Gras treat (these overnight beignets are a close second!) but every year, the Carnival season seems to rush by before I really get the chance to enjoy it. One minute it’s Epiphany, the next minute it’s Ash Wednesday, and somehow I’ve missed the window. Not this year. This year, mini king cakes have already happened – four batches so far! And they’ll probably happen again before Fat Tuesday.
This recipe is a revision of a king cake that already lives here on the blog. I reworked this cream cheese version to make three mini king cakes. Except this time they’re filled with cinnamon-brown sugar and toasted walnuts. Each 6-inch cake serves about four people – or one very hungry party reveler who takes Mardi Gras treats seriously. (Ahem.)

I tested a few different doughs while developing this recipe, including brioche-style and my favorite kringle dough, but I kept coming back to this one. It originates from the King Arthur Baking website, with adaptations for shaping and filling. What sets it apart and makes it different is the mixing method.
No blooming yeast, no complicated steps. You’ll simply layer the ingredients – including instant yeast (important, more on that later) – into a stand mixer and knead until a soft, stretchy dough forms. It’s efficient, reliable, and perfect for home bakers who want bakery-level results without extra fuss. It’s puffy, tender, lightly sweet, and deeply flavorful. The structure is strong enough to hold a generous swirl of cinnamon sugar, yet soft and enjoyable to eat.

Make the King Cake Dough
This dough comes together quickly and cleanly. Add all of the dough ingredients to the bowl of a stand mixer in the order listed in the recipe. (Yes, it’s that simple!) Start mixing with the paddle attachment to hydrate the flour and bring everything together into a shaggy mass. Once the dough begins to clump, swap the paddle for the dough hook.
Knead until the dough is smooth, elastic, and slightly tacky but not sticky. This will take about 5 minutes on medium-low speed in a stand mixer. Set a timer to be sure. The dough should stretch easily without tearing. This is a sign that the gluten has developed properly. If the dough feels tight or stiff, give it another minute or two of kneading.
Why instant yeast matters: Instant yeast doesn’t need to be dissolved or proofed first, which allows all the ingredients to be layered together at once. It also produces a steady, controlled rise, giving the dough structure and flavor. I use and recommend Saf-Instant Yeast. Store it in the freezer, and it will stay fresh for more than a year!

Let the Mini King Cake Dough Proof
Transfer the dough to a lightly greased bowl, turn once to coat, and cover.
Pro tip: Use your oven as a proofing box. Preheat the oven to 170°F, then turn it off. Wait about five minutes, then place the covered bowl of dough inside and close the door.
Let the dough proof for 1 hour. It will not double in size – this dough is meant to puff slightly, not balloon. Look for a soft, relaxed texture.

Make the Cinnamon-Sugar Filling
While the dough proofs, mix together the softened butter, brown sugar, granulated sugar, cinnamon, and vanilla until smooth and spreadable. Toast the walnuts separately until fragrant, then chop once cooled.

Fill and Shape the Mini King Cakes
1. Stretch the Dough
Turn the proofed dough out onto a lightly floured surface and gently pat it into a long rectangle about 7 x 30 inches. The dough should feel relaxed and stretchy, so you won’t need much rolling. You’ll mostly gently pat and pull the dough into shape. (See video for action.) If the dough feels too stiff, cover it for a few minutes to allow the gluten to relax , then try again.
2. Fill and Fold
Spread the cinnamon–brown sugar filling evenly over the surface, then sprinkle with toasted walnuts. Lightly brush the long edges with egg wash. Fold each side over the filling to create one long 30-inch pastry log, sealing the filling inside.
Tip: At this point, you could make one large King Cake by pinching the ends together and forming the 30-inch pastry into an oval ring. Overlap the two ends and brush lightly with egg wash. Make sure the ends are pinched together well or the filling will escape!
3. Divide and Stretch
For the mini cakes, cut the dough into three 10-inch sections. Gently stretch and pat each piece out to about 12 inches, then pinch (pinch pinch well!) the ends together to seal.
4. Shape, Rest, and Bake
Form each piece into a ring, tucking one end slightly under the other for a secure seal. Transfer to a parchment-lined baking sheet, cover loosely, and let rest for 1 hour.

Alternative Baking Method
If you have 6-inch cake pans (or even 6-inch pastry rings), these mini king cakes fit perfectly inside. While the free-form method works beautifully, the cake pan helps maintain a perfectly round shape. In my first test batches, one cake burst slightly and leaked a bit of filling – the pan prevents that and offers extra support.
Simply place the shaped ring inside a greased pan and bake as directed.

Bake the Mini King Cakes
Once the shaped king cakes have finished their final rest, brush them generously with egg wash. This step is important. The egg wash helps the dough bake up shiny, deeply golden, and evenly browned, giving the finished cakes that classic bakery look.
Bake the mini king cakes in a 350°F oven for 30–35 minutes, or until they are puffed, golden, and fragrant. The rings should sound slightly hollow when gently tapped.

Glaze and Sugar the Mini King Cakes
Once the cakes are completely cool, spoon glaze generously over the tops and immediately decorate with purple, green, and gold sanding sugars. Alternating the colors gives each cake that unmistakable Mardi Gras look.

A Short History on the Toy Baby
The tiny plastic baby hidden inside king cake represents good luck and prosperity. Traditionally, whoever finds the baby hosts the next Mardi Gras gathering or provides the next king cake. If you choose to include one, insert it into the bottom of a cooled cake and be sure to warn your guests.

The Mardi Gras season always seems to move faster than expected – a few short weeks of color, celebration, and indulgence before it disappears again. These mini king cakes are my way of savoring it all. Baking three smaller cakes instead of one large cake makes the tradition feel more shareable, and somehow more personal.
Related recipe: Mardi Gras King Cake

Mini King Cakes for Mardi Gras (From Scratch)
Dough
1/2 cup unsalted butter melted3/4 cup lukewarm whole milk2 large eggs + 1 egg yolk reserve egg white for egg wash3 1/2 cups all-purpose flour1/4 cup granulated sugar1/4 cup nonfat dry milk powder1 teaspoon fine grain sea salt2 1/2 teaspoons instant yeast1 teaspoon vanilla extract
Cinnamon Walnut Filling
1/2 cup unsalted butter very soft1/2 cup packed brown sugar2 tablespoons granulated sugar2 teaspoons ground cinnamon1 teaspoon vanilla extract1/2 cup toasted walnuts chopped
Glaze
2 cups confectioners’ sugarpinch fine grain salt1 teaspoon vanilla extract2 tablespoons whole milk plus more if needed to thin1/4 cup sanding sugars purple, green, and gold
Make the dough:
Place all dough ingredients in the order listed in the bowl of a stand mixer fitted with the paddle attachment. Mix together until a shaggy dough forms.
Switch to the dough hook. Knead until a soft, smooth dough forms, about 5 minutes with a timer set. The dough should be elastic and slightly tacky.
Transfer to a lightly greased bowl, turn once to coat, cover with greased plastic wrap, and let rise for about 1 hour. (See recipe notes for proofing tip) The dough will puff but may not double.
Prepare the filling:
In a bowl, mix the softened butter, brown sugar, granulated sugar, cinnamon, and vanilla until smooth. Set aside. Toast walnuts in a dry skillet until fragrant; cool and chop.
Shape the dough:
Turn dough onto a lightly floured surface and roll or pat into a 30-inch-long rectangle, about 6 inches wide.
Spread the cinnamon-sugar butter evenly over the dough. Sprinkle chopped toasted walnuts evenly over the filling.
Brush the long edges of the dough with egg wash and fold each edge towards the center, overlapping one edge of the dough slightly over the other (see video) and completely encasing the filling. Press gently to seal.
Cut dough into three 10-inch lengths. Stretch each piece gently to 12 inches. Pinch the ends of each length to seal in the filling (be thorough with this step, or the filling may spill out during baking). Form into rings by bringing the ends together, then fold one end slightly over the other and tuck underneath to secure.
Place rings on parchment-lined baking sheets (or in 6-inch cake pans). Cover loosely and let rise 45–60 minutes, until puffy.
Preheat oven to 350°F. Beat reserved egg white with 1 tablespoon water and brush over the rings. Bake 30-35 minutes, or until golden brown and fragrant. Cool completely.
Make the glaze
Stir together confectioners’ sugar, salt, vanilla, and milk until thick but pourable.
Spoon glaze over cooled cakes and immediately decorate with sanding sugars.
Make One Large King Cake: Make one big King Cake by pinching the ends of the 30-inch pastry together and forming into an oval ring. Overlap the two ends and brush lightly with egg wash. Make sure the ends are pinched together well or the filling will escape! See this blog post for method.
Add a Baby Charm: Insert a plastic baby into the bottom the cakes after baking and cooling, but before glazing, if desired. You can find them at party supply stores and for purchase online.
Special Ingredient: Nonfat dry milk powder improves dough structure and browning. I highly recommend using it. It keeps well in the pantry and is available in the baking aisle at your local grocery store.
Storage: These king cakes stay soft for 2 days when tightly covered at room temperature. Microwave slices for 15-20 seconds for the most delicious texture and flavor.