

This homemade vegan pie crust is flaky, buttery, and unbelievably easy to make! Once you try it, you’ll never bother with store-bought again. This recipe is perfect for both sweet and savory pies.
I hate making pie crust. My husband knows that whenever I’m getting ready to bake a pie, there’s going to be plenty of cursing going on in the kitchen. And frankly, store-bought crusts aren’t much better. Sure, the mixing is done — but you still have to roll, crimp, and bake, all while hoping it turns out looking pretty.
]]>Jump to:
My coconut oil pie crust is delicious, but it’s also a bit of a challenge to work with (as pie crusts go). So I decided it was time to come up with a nearly foolproof but still totally delicious vegan pie crust recipe.
This crust is made with a mix of vegan butter and shortening, giving it the perfect balance of flavor, flakiness, and structure. The dough is easy to handle, and the recipe makes plenty, so you won’t come up short when fitting it to your pie plate (always happens to me).
You’ll end up with enough dough for two bottom crusts or one double crust, so this recipe works for just about any pie you want to make, whether it’s vegan apple pie, vegan pot pie, or vegan pumpkin pie.
Ingredients You’ll Need
Below you’ll find a list of ingredients in this recipe, with notes and substitutions. Scroll all the way to the bottom of the post to see the full recipe, including the amount of each ingredient.
Flour. We’re using all-purpose flour, also known as white flour. I don’t recommend making any substitutions here.
Salt.
Vegan butter. I developed this recipe using Earth Balance, but pretty much any brand will do. Look for vegan butter in the refrigerated section of your grocery store, near the regular butter.
Vegetable shortening. Crisco or whatever brand your store sells in the baking aisle will work.
Water.
How It’s Made
The following is a detailed photo tutorial on how to make this dish. Scroll all the way down if you’d like to skip right to the recipe!

Step 1: Mix the dry ingredients. Whisk your flour and salt together in a large mixing bowl.

Step 2: Add the butter. Add cold vegan butter slices to the bowl, then cut them in with a pastry cutter.
Tip: Colder is better! Use cold butter, shortening, and water. If possible, chill your bowl, pastry cutter, and spoon in the fridge or freezer. Colder dough will give you flakier crust that holds its shape when baked.

Step 3: Add the shortening. Cut it in with a fork or pastry cutter, just like you did with the butter. Get the mixture to where it looks like coarse crumbs.

Step 4: Add water. Stir in a bit of cold water at a time. The mixture will turn into a shaggy dough.
Steps 5 & 6: Chill the dough. Shape it into a ball, wrap it up, and pop it into the fridge for an hour. Cut the dough in half when it’s done chilling, then return half to the fridge.

Step 7: Roll it out. Take that dough half and place it on a floured surface, then roll it into a big circle. You want the diameter to be about 2-inches larger than your pie plate.

Step 8: Shape it. Move the rolled dough to your pie plate, then cut off any extra dough and, if you’d like, crimp the edges. Poke some holes in the bottom to allow steam to escape.
Tip: Feel like getting fancy? Use the extra dough you trimmed to decorate the top of your pie. Cut it into pretty shapes then gently press them over your filling or top crust before baking.
Step 9: Repeat. If you’re making two bottom crusts, just repeat the rolling and shaping steps for the second half of your dough.
Step 10: Make a top crust. If you’re making one pie with a top and bottom crust, fill your bottom crust, roll the other dough half, and use it to form your top crust. Be sure to seal the edges and cut some holes in the top for ventilation.
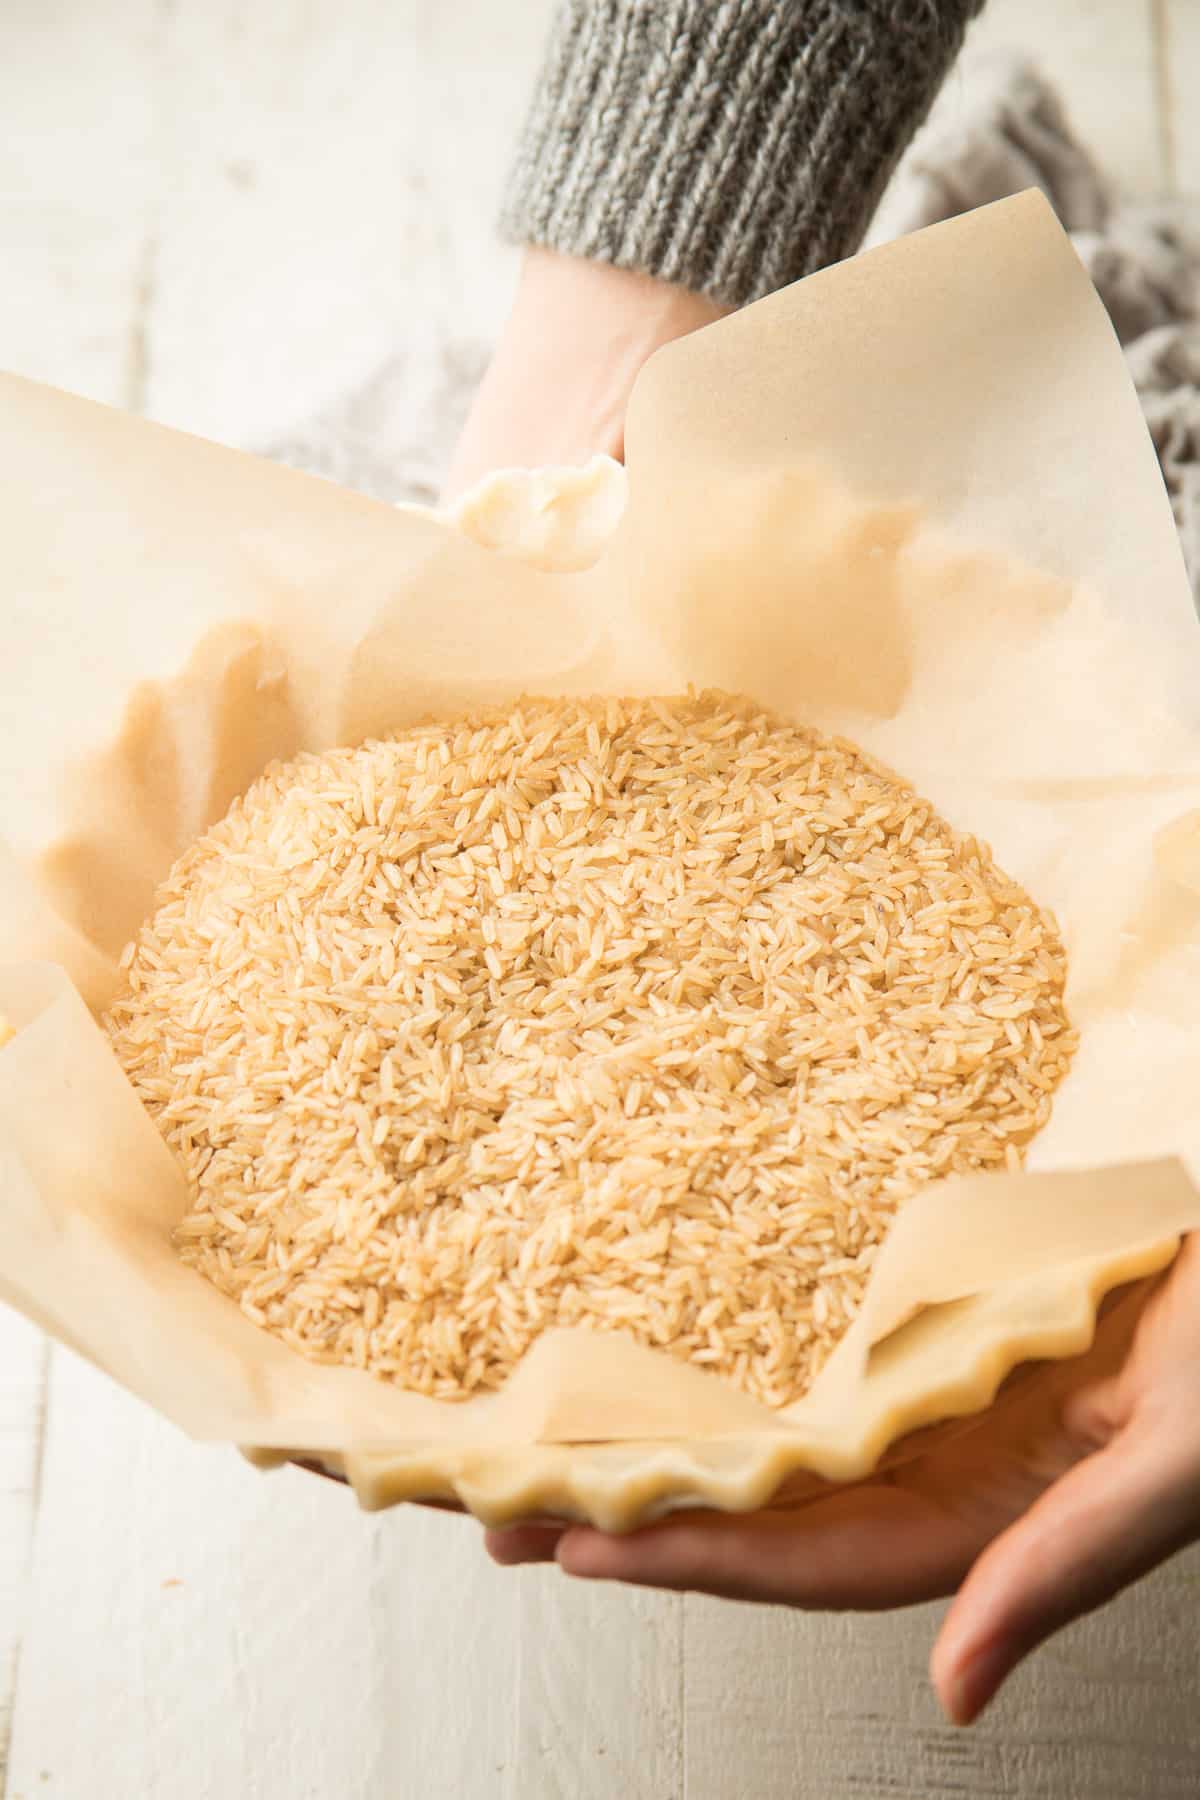
Step 11: Blind bake your crust. If you’re making a no-bake pie, you’ll want to bake your crust, because nobody wants to eat raw pie dough! Place a sheet of foil or parchment paper into your shaped crust, then fill it with pie weights, dried rice, or beans to prevent the bottom from puffing up during baking. Pop it into a 400°F oven for 20 minutes.
Tip: While not required, chilling your crust before baking is a great way to prevent shrinkage. Pop it into the fridge, or better yet, freezer, for 20 minutes before putting it into the oven.

Your vegan pie crust is done, and ready to be used in a delicious pie recipe!
Frequently Asked Questions
An all-purpose gluten-free flour blend might work, but I haven’t tested one with this recipe, so I can’t make any promises.
You sure can! Just cut it in half. No other adjustments are needed.
Unfortunately not. Both vegan butter and shortening contain refined oils, and they’re both key ingredients to this recipe.
Yes, and it’ll actually enhance the quality of the crust. For a bottom crust, proceed through step 8 or 9 (depending on if you’re making one or two). Freeze the crust for an hour to set it, then wrap the entire pie plate tightly in plastic wrap, followed by foil, and place it back into the freezer for up to three months. You can bake it directly from frozen — just add 5 minutes. For a top crust, roll it out and place it between 2 sheets of parchment paper. Carefully, loosely roll it up. Wrap it up and stick it into the freezer.
Tips for Success
Work quickly. Don’t rush, but keep in mind that your fats will warm up as you work with them. We want them cold for that perfect, flaky texture! If you notice your butter starting to soften, pop the entire bowl of ingredients into the freezer for a few minutes.
Chill before baking. If your pie recipe permits, place the pie (or just the crust) into the fridge or freezer to chill before baking. Again, we want those fats nice and cold when the crust starts baking!
Don’t overwork the dough. As you work the dough, gluten develops. Too much of that can make your crust chewy rather than tender and flaky.
Fix cracks. Cracks in the dough will sometimes happen, no matter how carefully we try to avoid them. Gently press them back together with your fingers or use a piece of excess dough to patch them.
Vegan Pie Recipes
Ready to use your crust? Give one of these delicious pies a try!
Like this recipe? If so, please stop back and leave me a review and rating below if you try it! Also be sure to follow me on Facebook, Pinterest or Instagram, or subscribe to my newsletter for more recipes like this one!
📖 Recipe

Print
Pin
]]>
Vegan Pie Crust
This homemade vegan pie crust is flaky, buttery, and unbelievably easy to make! Once you try it, you’ll never bother with store-bought again. This recipe is perfect for both sweet and savory pies.
Ingredients
Instructions
Whisk the flour and salt together in a large mixing bowl.
Add the butter slices, then use a fork or pastry cutter to cut them into the flour mixture.
Add the shortening to the bowl, then cut it in just like you did with the butter. Continue until the mixture resembles coarse crumbs.
Begin stirring in the water, adding a splash at a time. Once all of the water has been added, the dough may still look shaggy, but it should hold together when pressed with your fingers.
Shape the dough into a ball. Wrap it tightly in plastic, then place it in the fridge and let it chill for an hour.
After the dough has finished chilling, remove it from the fridge and divide it in half. Place half back into the fridge while you shape the remaining half.
Lightly sprinkle a work surface and rolling pin with flour, then roll the dough into a large circle about 2 inches larger in diameter than your pie plate. So, for a standard 9-inch pie plate, roll the dough into an 11-inch circle.
Carefully transfer the dough to the pie plate, gently pressing so it conforms to the inside of the plate. Poke holes into the bottom and sides of the dough for ventilation. Trim excess dough, then, optionally, crimp the edges.
For a second crust: Repeat steps 7 and 8 using the other half of the dough.
For a top crust: Fill your bottom crust, then roll the other half of the dough to about 1 inch larger than your pie plate, and cover the filling with your newly rolled dough. Pinch or crimp the edges, cut a few holes in the top for ventilation, then bake according to the recipe.
For no-bake pies: Place the crust(s) into the fridge, or better yet, the freezer to chill while the oven heats up. Preheat the oven to 400°F. Line the inside of your crust with foil or parchment paper, then fill it with pie weights, or dried rice or beans. Bake the crust(s) for about 20 minutes, until the bottom feels set and the edges are lightly browned. Place the pie plates on a cooling rack and let them cool completely before filling according to your pie recipe.
Notes
For standard (non-no-bake) pies, there’s no need to blind bake the crust unless the pie recipe specifically instructs you to. Simply assemble the crust, fill, and bake according to your recipe.
Nutrition
Calories: 204kcal | Carbohydrates: 18g | Protein: 2g | Fat: 13g | Saturated Fat: 3g | Polyunsaturated Fat: 4g | Monounsaturated Fat: 5g | Trans Fat: 1g | Sodium: 215mg | Potassium: 28mg | Fiber: 1g | Sugar: 0.1g | Vitamin A: 405IU | Calcium: 4mg | Iron: 1mg